Understanding Document Security Permissions & Policies
17 May, 2020Once all your files have been published to a ShareVault, you’ll want to define the document’s security permissions and policies. The permission for a document defines which users or groups have access to the document. A policy, on the other hand, is a customizable collection of security attributes that define what a user is allowed to do with a document.
Defining Security Permissions
In ShareVault there are three ways to define a document’s permissions:
- On the Users & Groups page, you can define which tags a group can access by double-clicking a group and then selecting the tags you’d like them to be able to access.
- On the Documents page you can select a tag and then define the permissions for the tag. To do this make sure you’re in “Edit Tags” mode by clicking the Edit Tags button at the bottom of the page.
- In the event that you’d like to make the permissions of a particular document different from the permissions of the tag(s) attached to the document, you can do a “Permissions Override” by selecting the document on the Documents page then unchecking the “Use permissions and policies from tag(s)” checkbox at the bottom of the page. Note that when you use the Permissions Override feature you can set the permissions for that document at either the user or group level, whereas in the two cases above it will be at a group level only.
Security Policies
Once you’ve set the permissions for your ShareVault you’ll want to define what users are allowed to do with the documents they have access to by setting the policies for those documents. The following security attributes can be applied to a document:
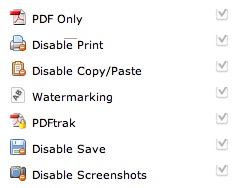
Checking “PDF only” prevents the user from viewing the original version of the file—the user will only be able to view the file as a PDF.
Checking “Disable Print” prevents the printing of a document.
Checking “Disable Copy/Paste” prevents users from being able to copy text from a PDF and then paste it into another document.
Checking “Watermarking” allows you to apply watermarks to every page in the PDF.
PDFtrak provides enhanced document security and tracking capabilities allowing you to:
- Prevent users from saving PDF files.
- Block print screenshots (alt-print scrn) while a PDF is open.
Retroactively change permissions to print or view a file even if it has already been downloaded.
Track and report each user’s viewing time and pages viewed.
If PDFtrak is enabled for your ShareVault you can configure PDFtrak’s idle time by clicking the Configure PDFtrak button:
![]()
By ignoring idle time PDFtrak can more accurately measure the amount of time that a user is actively reading documents. If the user stops scrolling through a document for more than a few minutes, then he/she has probably stopped reading, so setting the idle time to about 3 minutes should be about right.
How to Set Security Policies
When you go to the Admin page of a ShareVault and click the Policies tab you’ll be presented with a window that will look something like this:
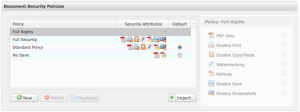
The first policy is the Full Rights policy. You’ll notice that when the Full Rights policy is selected all of the security settings to the right are unchecked and shaded. That’s because this is a static policy and cannot be modified, deleted or renamed. This is the policy granted to administrators. It has no security attributes so users granted this policy can view, print and save both the PDF version of the document as well as the original document.
The next policy is the Full Security policy. You’ll notice that the Full Security policy is just the opposite of Full Rights. When Full Security is selected all the security checkboxes to the right are checked, but they’re also shaded, meaning that like the Full Rights policy this is a static policy and cannot be modified.
The first policy that is customizable is the Standard policy. You can make changes to this policy by checking or unchecking the security attributes that you want applied to this policy. You can also rename this policy simply by double clicking the policy’s title and typing a new one.
If you’d like to create a new policy, click the “New” button and give your policy a name. Then select the security attributes you’d like to apply to that policy.
You’ll notice that next to the “New” and “Delete” buttons there’s also a “Duplicate” button. Sometimes it may make sense to simply duplicate an existing policy then make one or two changes to it. For instance, you might want to duplicate the Standard policy, uncheck the Disable Print checkbox and rename the policy “Allow Printing.”
If you are the administrator of more than one ShareVault you can import existing policies from other ShareVaults by clicking the “Import” button.
Once all your policies are set up, you can choose which one you’d like to designate as the default policy by clicking the “Default” radio button immediately to the right of the security attributes icons.
To configure the text and appearance of your watermarks, click “Configure Watermarking” and a new window will appear:
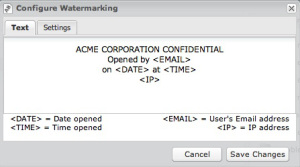
You can edit the text of the watermark in this window. Within the watermark text, you can use the four variables in angled brackets to substitute for the date and time the document was opened, the user’s email address, and/or the user’s IP address.
The watermark will be displayed diagonally across the page using a stitched outline font with a blue color.
Wrap Up
Now that all your security permissions and policies are defined, you’re ready to invite your users and go “live” with your ShareVault. As always, feel free to reach out to our 24/7 Support Team if you run into any snags!